
BRAKES - AIR
TRUCK SERVICE MANUAL
INSTALLING POWER UNIT
REMOVE AND DISASSEMBLE
ONTO BRAKE ASSEMBLY
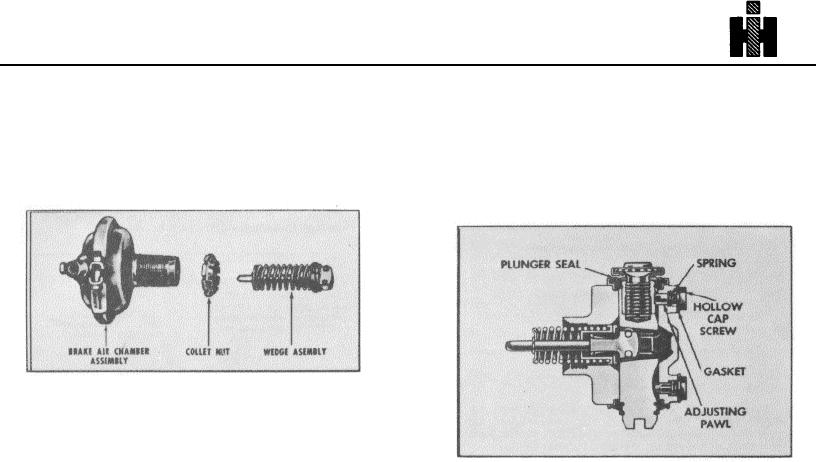
AUTOMATIC ADJUSTING ASSEMBLY
A.
Check position of the wedge in plunger housing
A.
Remove brake shoes from brake spider.
to make certain wedge assembly is properly
B.
Remove adjusting pawl assembly (hollow
seated. Then, thread collet nut onto power unit
capscrew, gasket, spring and adjusting pawl)
tube.
from plunger housing. It may be necessary to
use a magnet to remove the adjusting pawl.
This is the correct position of the collet nut when used
with current broke spider having a conical counterbore.
B.
Apply a non-hardening sealer to the first three
threads of the chamber tube.
C.
Using a suitable screwdriver, pry the plunger
C.
Thread the power unit into the plunger housing
seal loose from the plunger housing. Then,
until it bottoms (collet nut loose).
remove the adjusting plunger (with adjusting
D.
Align connection ports with brake lines.
If
sleeve, adjusting bolt, and plunger seal) from the
necessary, unthread power unit not more than one full
plunger housing.
turn.
D.
Remove the adjusting bolt, with sleeve (actuator)
E.
Connect brake lines.
and plunger seal from adjusting plunger.
F.
Make and hold a full brake application. Then,
E.
Thread adjusting sleeve all the way onto the
hand tighten collet nut.
adjusting bolt until it bottoms against plunger
G.
Tighten collet nut with a drift and hammer 1%
seal. Then, use a suitable pair of snap ring
teeth (or 3/16 turn) and release brake pressure.
pliers and remove snap ring from end of
H.
Check for leaks at all connections.
adjusting bolt.
F.
Unthread adjusting sleeve from adjusting bolt.
SERVICING PLUNGER HOUSING
G.
Remove plunger seal from adjusting bolt by
The following maintenance instructions can be used to
gradually working the bolt through the seal hole.
service the automatic adjusting assembly of the
PREPARE FOR REASSEMBLY
Stopmaster II wedge brake.
A.
Thoroughly clean and inspect all parts, including
the housing plunger, seal bores, and shoe rest
pads. Wire brush plunger parts and adjusting
bolt threads to remove caked-on dirt and
corrosion.
IMPORTANT:
DO NOT use solvent to clean any
rubber parts (plunger seals or gaskets).
B.
Carefully inspect plunger seals and gaskets for
tears, cuts or deterioration and replace if
necessary. Also, check the angled plunger roller faces
for pits, grooves or nicks. Replace if necessary.
223

