
BRAKES-AIR
TRUCK SERVICE MANUAL
8. Install the previously rebuilt descant sealing plate on
the cartridge bolt so that the ball check retain: clip
5. Place the slot in the plunger (cap nut end) over the
can be seen.
blade of the screw driver, hold it securely and
remove the nut from the plunger using a 1/2" socket
9. Using the lock nut draw the assembly together to
wrench.
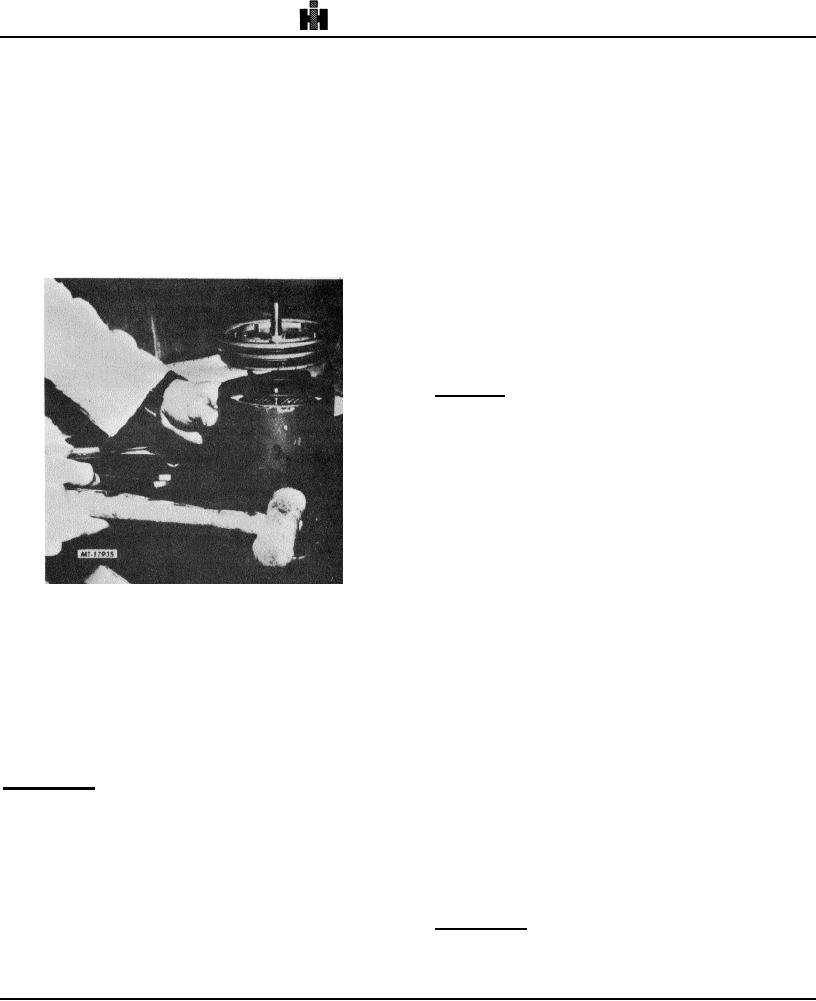
approximately half of spring's free height. While
slowl5 turning the cartridge, tap the side of the shell
6. Remove the plunger, spring and valve; discard the
with a plastic mallet (Fig. 16). This allows the
valve.
desicants material to settle properly into place.
7. Clean and inspect the plunger bore and the valve
Continue to tighten the nut making sure all items are
seat.
properly aligned. Tighten nut firmly using an 11/16"
socket or box wrench.
8. Remove and discard the three O-rings from the
plunger; clean the plunger.
NOTE: If during the serviceability checks it was
determined that the heater and thermostat were
defective, replace end cover as an assembly.
Assembly
1. Using Item 1 of LUBRICATION SPECIFICATIONS,
lubricate and install 0rings on the plunger and cap
nut.
2. Lubricate the plunger bore and install the spring and
plunger (through the cap nut end).
3. Install the valve on the plunger making certain the
chamfered end of the valve is in contact with the
metal seat of the body.
Fig. 16
4. Using the screwdriver held in the vise, as described
in Steps 4 and 5, compress the plunger into the bore
REBUILDING AD-1 END COVER ASSEMBLY
while installing and tightening the nut.
To remove the end cover assembly fl the air
5. Install the cap nut and tighten it.
dryer follow Steps 1 through under "Removal of
Desiccant Cartridge AD-1 & AD-2." Before rebuilding the
6. Lubricate and install the large diameter O-ring
E cover, clean the exterior thoroughly using a quality
around the end cover assembly with Item 1 of
commercial solvent.
LUBRICANT SPECIFICATIONS.
Disassembly
REBUILDING AD-2 END COVER ASSEMBLY
1. Remove and discard the large O-ring around the end
To remove the end cover assembly from the air dryer,
cover.
follow Steps 1 through 6 under "Removal of Desiccant
Cartridge AD-1 & AD-2." Before rebuilding the end cover,
2. Remove the exhaust elbow and clamp 3. Remove
clean the exterior thoroughly using a quality commercial
the cap nut and discard the cap nut O-ring.
solvent.
4. Place the handle of a large screwdriver in a vise and
Disassembly
secure
it.
1. Remove and discard the large O-ring around the end
cover assembly.
181