
TRUCK SERVICE MANUAL
BRAKES-AIR
for valve. However, it should be checked periodically as
follows.
Air leaks (disregarding normal exhaust) may appear
at exhaust port. Nominal leakage of slow bubbling of
soap will have little consequence in most systems. A
leak at exhaust port when valve is applied indicates
exhaust seal leaking.
If leakage occurs at stem end (at control knob) of
valve, stem seal is leaking. If leakage is noted the valve
must be removed and either replaced or repaired
REMOVE
Refer to Fig. 4 for numbers in parenthesis.
1. Loosen lock nut (12) and remove knob (13).
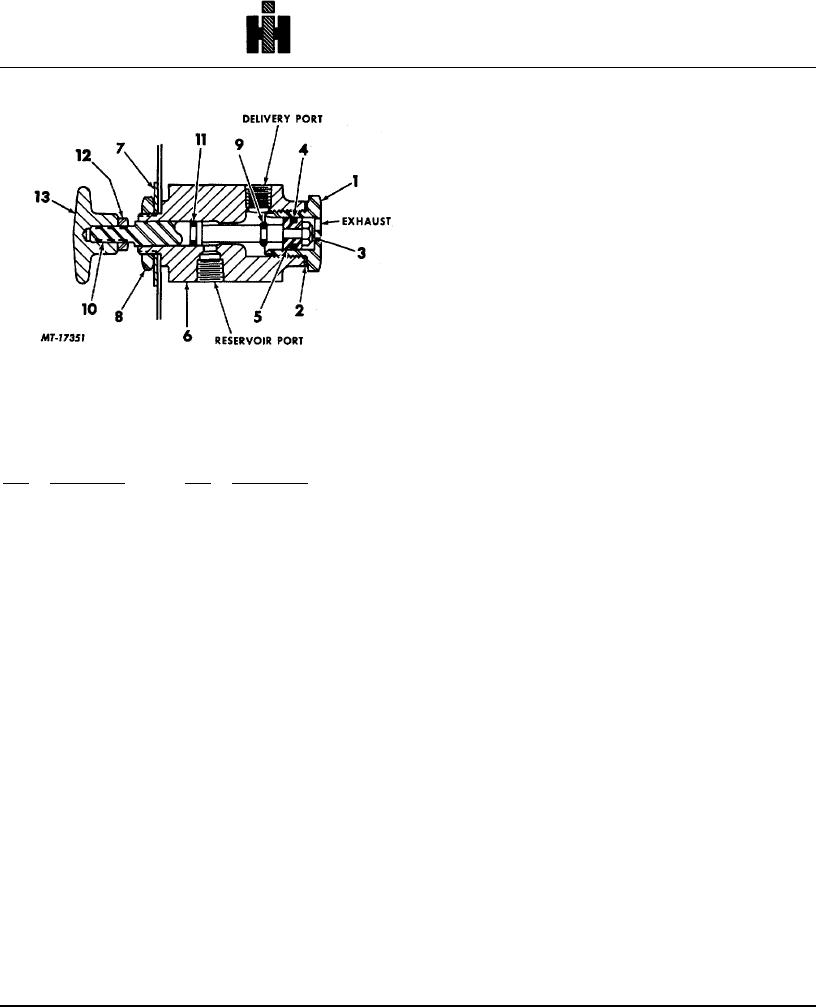
Fig. 4. Sectional View of Type PB
Lock nut can now be removed.
Two-Way Control Valve
2. Disconnect air lines at valve.
3. Loosen and remove valve mounting nut (8); then
Legend for Fig. 4
name plate (7); then remove valve.
Key Description
Key
Description
INSTALL
1 CAP, Valve End
8
NUT, Mounting
2 GASKET, End Cap
9
O-RING STEM,
1. Position valve through instrument panel.
3 NUT, Valve Stem
Center (5/16" or
2. Install name plate and mounting nut.
4 O-RING, Piston
10
STEM, Valve
3. Connect air lines; then install control knob lock
(1/2" OD)
11
O-RING STEM,
nut and knob. Tighten lock nut against knob to
5 PISTON
Front (3/8" OD)
secure it.
6 BODY
12
NUT, Lock
7 PLATE, Name
13
KNOB
NOTE: Prior to returning vehicle to
MAINTENANCE
service, perform SERVICE CHECKS as
outlined.
Once each year or every 100, 000 miles the valve
should be removed, disassembled and repair kit
DISASSEMBLY
installed.
Refer to Fig. 4 for numbers in parenthesis.
1. Remove end cap (1) and gasket (2).
SERVICE CHECKS
2. Remove valve stem nut (3). To remove nut
install two nuts on opposite end of stem (10)
Normal usage tests will provide good checks
locking stem. Use a wrench at each end of stem
to loosen stem nut (3).
3. Pull stem (10) from body (6).
4. Remove piston (5) from body.
CLEANING AND INSPECTION
Wash all metal parts in good cleaning solvent.
Inspect body for nicks or burrs in bore of valve., Replace
complete valve assembly if body is not considered
serviceable.
Use new parts supplied in repair kit.
161